Module 1
[Find Ceiling Room by Point]
With this first module, and the rest of the upcoming ones, I’m assuming you have used Revit Dynamo and looking for practical applications for work and play. If you have not used Dynamo, I suggest heading over to www.dynamobim.org and checking out the Dynamo Primer. Or, you can give the example below a crack and let me know if you have any questions of which I will be happy to help you out.
This first module is about a little problem I recently ran in to while using Revit. It was the issue of associating ceilings with rooms. Basically, I wanted to create a schedule in Revit which included a parameter that indicated the room to which the ceiling was associated. In order to achieve this, I utilised Dynamo to basically find all ceilings in the project, create a point under those ceilings and find the room that point lies within.
Before I started the script, I added a parameter to all ceilings which is called “CEILING-ROOM’. This means I can later schedule which room each ceiling is used based on this parameter. The solution to this is shown below and each step explained.


The start of this script is quite simple. Firstly the node Categories allows us to select a category within Revit. We retrieve All Elements of Category which is self-explanatory. Next all of these elements are converted to Solids using Element.Solids and the center point of these solids are found with Solid.Centroid.

The second part of this script basically moves the points we retrieved using Solid.Centroid down in the ZAxis by 1000mm by using Geometry.Translate. This is to make sure the point is within the room area and not situated on the boundary.

Next the points are fed into a Python script which basically finds the room that a point is contained in. This is explained further through points 5 to 9.
Alternatively, you can download the node Get.RoomNumberByPoint which is found in the Juggernaught package, in the Package Manager.

The final node Element.SetParameterByName is used to update the parameter “CEILING-ROOM” in all ceilings, as collected in the All Elements of Category node. The output of the Python Script provides us with the parameter values for each ceiling which is the room number as shown in point 8. As the order of ceilings and room numbers input into the Element.SetParameterByName are the same, the correct room number should be associated with the correct ceiling element.
-

- Python Script


Firstly, the relevant libraries are imported for use in the Python script.

Importing the DocumentManager allows us to access the current document and set it to the variable doc.

The incoming points from Geometry.Translate in Point 2 are unwrapped here which allows us to use the points with the Revit API. More information about unwrapping elements can be found here.

This is where the meat of the script basically is. The toggle variable allows us to reset the script as the node sometimes has a hard time updating. If toggle is set to True, a for loop starts which checks each point for what room it is in using doc.GetRoomAtPoint(points) and then appends the points to the lst list. This list is then fed out to the Dynamo workspace.

If the toggle is set to False, this last part of code will run which basically outputs the string “Set toggle to TRUE“.
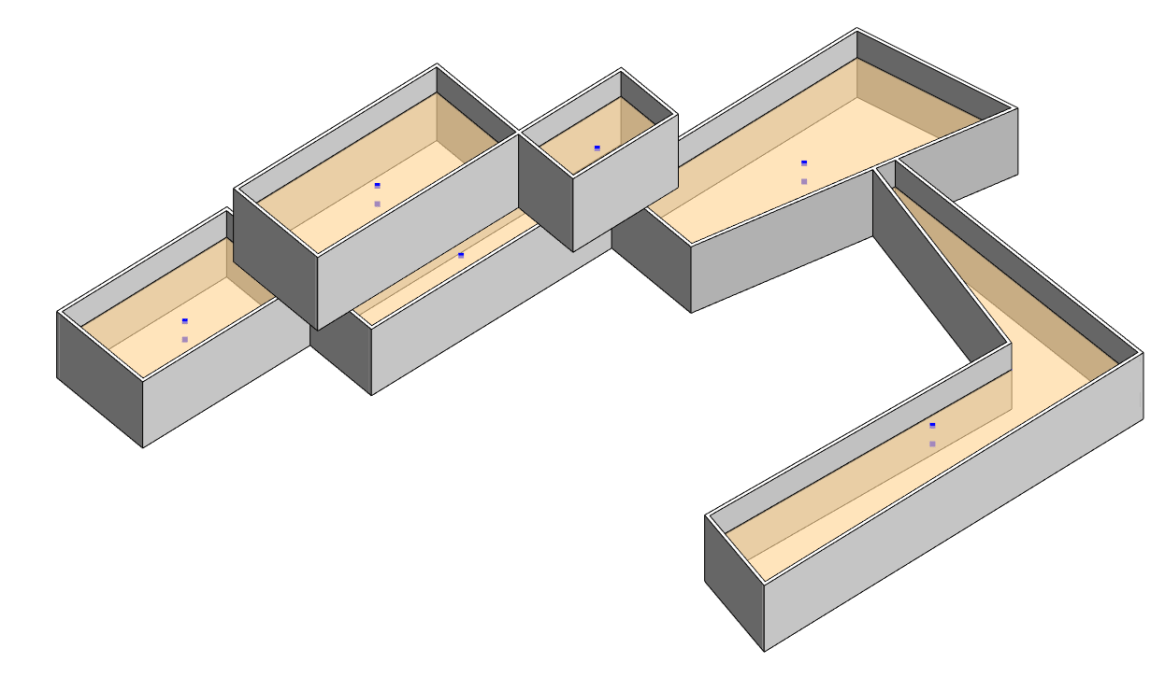
As you can see from the image above, the result of the Dynamo script can be seen above. The transparent yellow areas are the ceilings that we have gathered in the script and the blue dots are the points that we have created. These points are shown in two instances; 1 in line with the height of the ceiling and 1 translated 1000mm below the ceiling height. As stated earlier, this allows us to ensure the point is within the room.
The final result is the schedule on the right. This shows each ceiling with the preset parameter CEILING-ROOM which is populated by the corresponding room of which the ceiling is contained it.
Please feel free to comment below or contact me if you have any queries. The Dynamo file used for this can be downloaded below.


*Built for Dynamo Version 0.9.1
May 5, 2016 @ 3:41 pm
Centroid is not good decision
http://joxi.ru/V2VaEagS0XlMkm
May 7, 2016 @ 5:17 am
Hey Dmitry.
I would have agree that in your particular case, it would not be ideal. However, in most conventional ceiling construction it should work quite well.
May 8, 2016 @ 1:06 am
Nicely explained, but why is a toggle as input required at step 8?
If it is always required why not build it in?
And what does “node sometimes has a hard time updating” mean? Why does it happen?
If it is a quirk of Dynamo it would be handy to know.
May 9, 2016 @ 5:56 am
G’day Antony!
This is a quirk with Dynamo although I have checked it is still the case in 1.0.
Basically, Dynamo doesn’t always refresh after its initial run unless you make changes to the script. The toggle lets you refresh the script manually.
May 18, 2016 @ 4:50 pm
When I use ceilings as the category, I get an error for the Solid.Centroid node.
Warning: Internal error, please report: Referencing a non-pointer. (3f47aacd)
But if I create a room and change the category to Rooms, it works.
I’m using v1.0.0.1180
May 20, 2016 @ 6:09 am
Hi Tom,
That’s very odd.. I built the script using 0.9.1 so that might be the cause of the problem as there were huge changes to the Dynamo API from 0.9.1 to 1.0.
I plan on redoing this script in the next couple weeks for Dynamo 1.0 and a couple upgrades so hopefully that will fix it for you.
cheers
July 12, 2016 @ 12:48 pm
You are amazing Jeremy
November 6, 2016 @ 4:08 am
Jeremy,
i tried with Dynamo 1.2 and it doesn’t work.
please take a look.
https://drive.google.com/a/msdl.ca/file/d/0BxTXmoEnYjnNQmhCVzRSMVJENlE/view?usp=sharing
thank you
December 5, 2017 @ 10:11 pm
hello jeremy, first I apologize for my english, it’s not my language, but I hope you can take the idea.
by the way, thanks for the tutorials, they are really good.
Well, the reason I’m writing to you is that when I “execute” the script, the python node returns an error like this:
Warning: IronPythonEvaluator.EvaluateIronPythonScript operation failed.
Traceback (most recent call last):
File “”, line 25, in
AttributeError: ‘NoneType’ object has no attribute ‘Number’
the line 25 is:
25. lst.append(room.Number)
… and I have no idea why this is happening, I would appreciate any explanation
December 6, 2017 @ 10:42 am
Hi Ariel,
Your English is good, easily understood 🙂
With your problem, it is likely happening because on line 24, the method “GetRoomAtPoint” is not finding any room. Is the point you are checking definitely within a room volume?
If you want to send me your revit file I am happy to check why it is happening. What version of Revit and Dynamo are you using?
March 31, 2018 @ 12:09 pm
Hi Jeremy,
My greetings,
My co-worker asked me the solution for this exact case you gave here few weeks ago. I haven’t had time to solve it within Dynamo (I am new with Python and have used Dynamo more than 1 year).
Thank you for posting it, please allow me to give him your script and try to implement in the project.
I keep looking/learning through your posts.
Thank again.
March 31, 2018 @ 9:58 pm
Hey mate, thanks for your message. No problem, happy for you to share.
August 9, 2018 @ 10:29 am
Hello Jeremy,
Thank you for the script and detailed step by step guide. Very helpful for learning.
I am just curious; following this logic, can one automate the recognition of ceiling family types in Revit rooms? In your example, you create a list of ceilings with room numbers/names. What I am thinking is a list of rooms with ceiling finishes along with other room propertiues (kind of the other way around).
Cheers
Boris
August 15, 2018 @ 12:21 pm
Hey Boris!
My pleasure mate, i’m glad you are learning from it.
Yes for sure you can, you could start with a room centre point and project rays up to find the ceiling element, and from this extract the type. Anything is possible with the API mate! Give me a shout if you need a hand developing it.
cheers,
Jeremy
November 30, 2018 @ 10:58 pm
Hi Jeremy
thank you for your efforts
I have Problem with applying this Tutorial the Dynamo Return this Error when run the script ,
Warning: IronPythonEvaluator.EvaluateIronPythonScript operation failed.
Traceback (most recent call last):
File “”, line 21, in
AttributeError: ‘List[object]’ object has no attribute ‘ToXyz’
January 30, 2019 @ 9:48 am
Hi MQK,
This is because the ToXyz method is being called on a list rather than a single item. are you inputting a list of lists for the points input?
December 19, 2018 @ 3:37 pm
Hi Jeremy,
Thanks for the post is very Helpful.
Could you please help with this issue retrieving Room Numbers?
Warning: IronPythonEvaluator.EvaluateIronPythonScript operation failed.
Traceback (most recent call last):
File “”, line 27, in
AttributeError: ‘NoneType’ object has no attribute ‘Number’
I´m using RVT2018 and Dynamo Build 2.02
Regards
January 30, 2019 @ 9:49 am
Hey Dca, it sounds like the rooms aren’t being retrieved, are the points appearing in the Revit PReview?
July 5, 2019 @ 9:49 am
You need try to pass exceptions, see below
if toggle == True:
for point in points:
try:
room = doc.GetRoomAtPoint(point.ToXyz())
lst.append(room.Number)
except:
continue
OUT = lst
July 5, 2019 @ 10:12 am
mistake there, you need to still add an append in the exception call(Else it will make shorter list):
except:
lst.append(“could not locate”)
February 8, 2020 @ 7:25 pm
Hi Jeremy,
Thanks for the great script.
Is there any opportunity for the python script to read the room from a link file.
In another words, I`m running the script in the file which have the ceiling and the rooms are in a linked file.
I`m assuming the Py script needs to be amended to read the linked rooms instead.
It would be great if you can help me with that.
Thanks,
Ahmed.S
December 18, 2020 @ 8:33 am
thank you so much for the great script. Could we show related “Room Name” instead of Room Number? I tried to change it in the script but seems not work.
Looking forward to getting your feedback
Much appreciated!
Sang
February 21, 2021 @ 12:33 am
Hi guys,
I have the same problem as Sang.Le. I need to report the “Room Name” in a schedule. Room Number works fine; but not “Room Name” if Number is changed by Name. Why? How could we fix to report Room Name?
Thanks.
February 21, 2021 @ 12:37 am
Hi guys,
I have the same problem as Sang.Le. I need to report the “Room Name” in a schedule. Room Number works fine; but not “Room Name” if Number is changed by Name. Why? How could we fix to report Room Name?
Thanks.
September 26, 2022 @ 6:22 pm
Yes, you can! It is weird, but for some reason python scrips have problems with parameter “Name”.
more below:
https://w7k.pl/DynamoScript-AssignRoomToCeiling/